Developers' guide to registering an application with Audaconnect.
Introduction
This is a how to guide on using the AudaConnect portal. The AudaConnect Portal is used to provide details of any applications you wish to create that will make use of the API’s provided by Audatex. In order to do this you must provide details of the application such as name and the scopes your application will require. This will then create an application which will be reviewed and once approved will allow you access to the specified API calls.
When you first navigate to the AudaConnect Portal (eg.
https://audaconnect-demo.ax-aee.co.uk/AudaAPI.Portal/
) you will arrive on the Welcome page. This page provides some useful information about the current development of AudaConnect, useful contact point, and simple steps that must be performed before you can use the portal to create applications. The portal also provides menu tabs to navigate to other parts of the portal.
Home – Home screen where welcome information and useful updates are provided
My Client Applications – Page used to create, update and remove definitions for applications which will make use of Audatex API’s
About – Provides additional information about AudaConnect
Contacts – Provides contact information for any queries you may have.
Log in – Allows you to log into the AudaConnect Portal.
In order to log in either click “My client applications” or “Log in” menu tabs. This will open the Login page. You must then enter your details which you will have received after the registration process. Once all the details have been filled in click on the Log in button and you will be logged onto AudaConnect portal.
Company Code – a unique code linked to your company, you will have received this with your registration.
User Name – The username you setup during registration.
Password – This will have been generated during registration and will require changing the first time you log on.
Remember me checkbox – check this if you want the site to remember your password
Forgot password – will open the reset password page
Once you have logged on you will see the “log in” menu tab replaced with your company name/username. Clicking on this menu tab will now allow you to select the log off option which will log you off the portal.
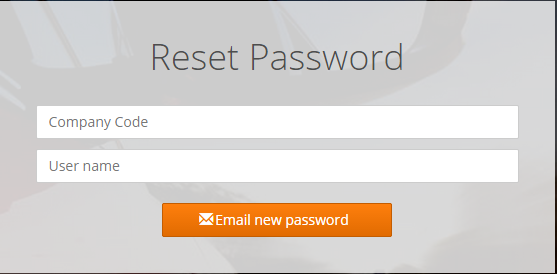
If you ever forget your password you can reset it via going to the Log in page and clicking on the Forgot password link.
Once you are on this page enter your company code and user name and click the Email new password. This will email you a temporary password which you can then use to login, once you have been logged in you will be prompted to update the temporary password to a new password.
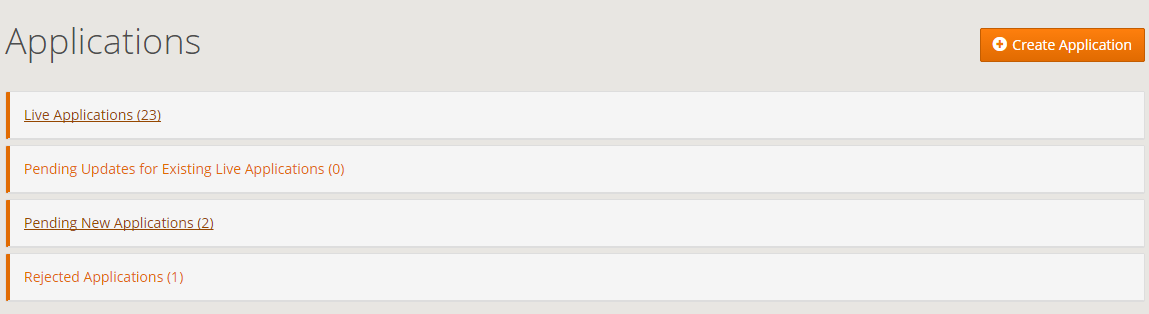
My client application is where you define what applications you want to create that will make use of the API’s Audatex provided. Each defined application is broken down into 4 categories.
Live applications are definitions of applications that have been approved. These applications have been provided with a secret key which will allow them access to the API that has been requested. The application must also make use of the same Callback URL otherwise it will not be allowed access.
Pending Updates for Existing Live Applications is where any edits to live applications are stored until they have been approved. Once this occurs they will replace the current live application.
Pending New Applications are applications that have been defined but not gone through the approval process
Rejected Applications are applications that have been rejected by the approval process.
Only applications in the Live Applications section will have been provided with a secret key which is required to access any of the Audatex API’s. Each live application will be limited by the scopes given.
In order to create an application that will make use of the Audatex API’s it must first be defined through the portal and then approved via the approval process. This will generate a secret key which allows any created applications to access the scopes selected when the application was defined.
How to create an application
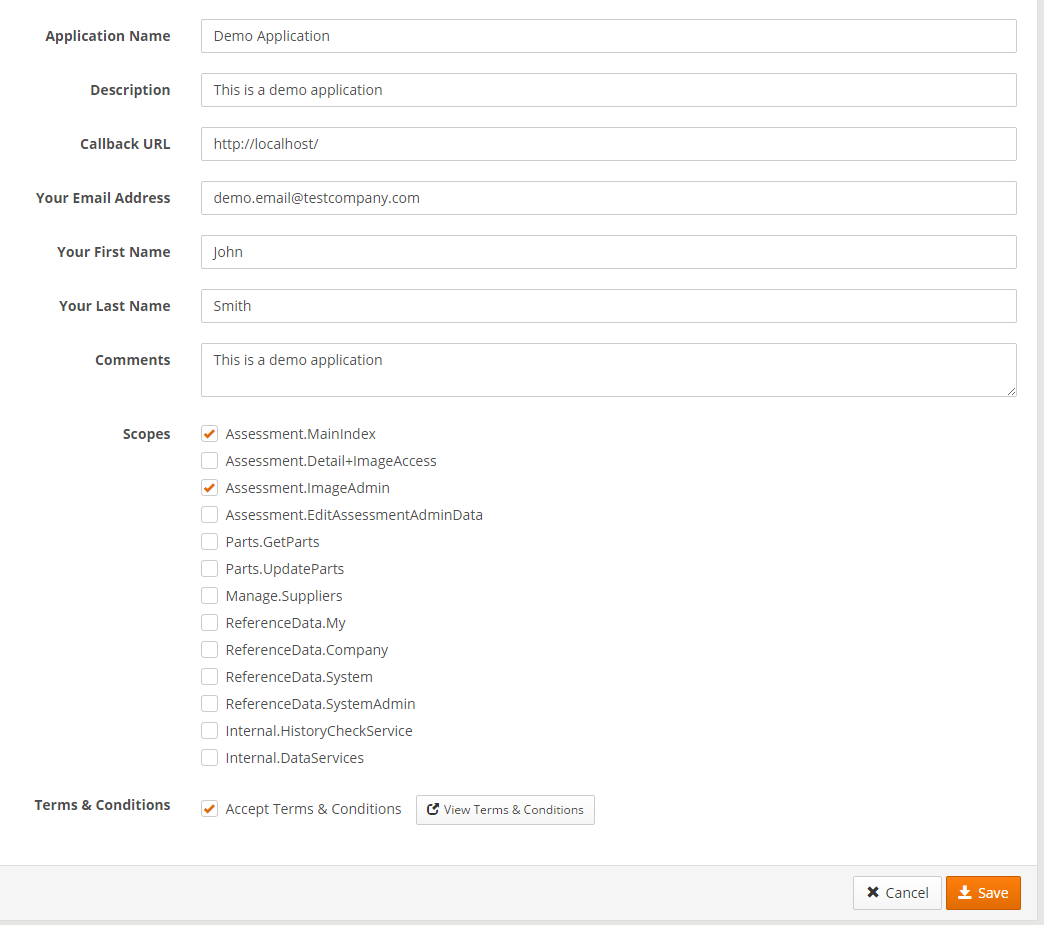
1. On the My Client Applications page click the Create Application button. This will open create a new application page.
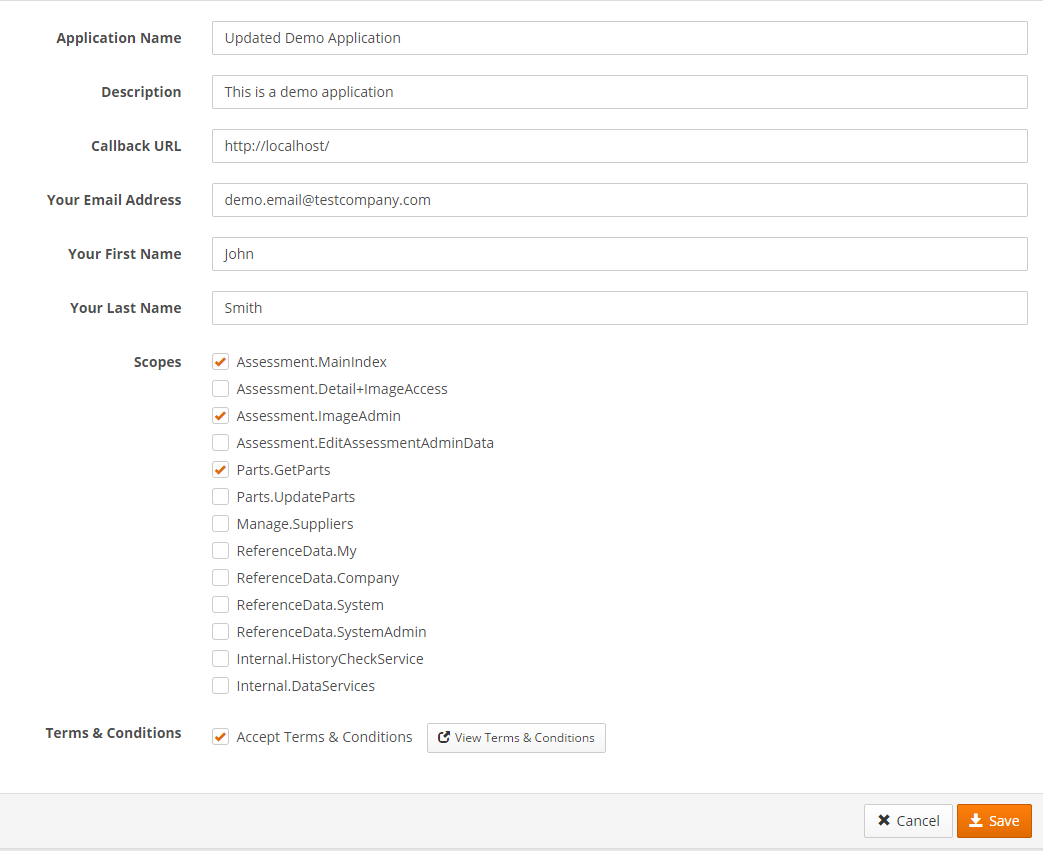
2. Fill in the form provided using the information contained below. All the fields in bold are required fields.
Application Name – Used to identity your application
Description – Brief description of what your application is going to do
Callback URL – Where the browser will get redirected to with the authorisation code
Your Email Address – Email address, used for resetting passwords.
Your First Name
Your Last Name
Comments – Any additional information.
Scopes – Select which API you want your application to have access to, ensure you keep this to the minimum required as this will improve the chance of approval.
Terms and Conditions – Click on the view Terms & Conditions, this will details all conditions of use. Check the Accept Terms & Conditions once you have read the documentation.
3. After filling in the required information click on “Save” button and the application will be added into the Pending New Applications sections and you will be returned to the Applications page.
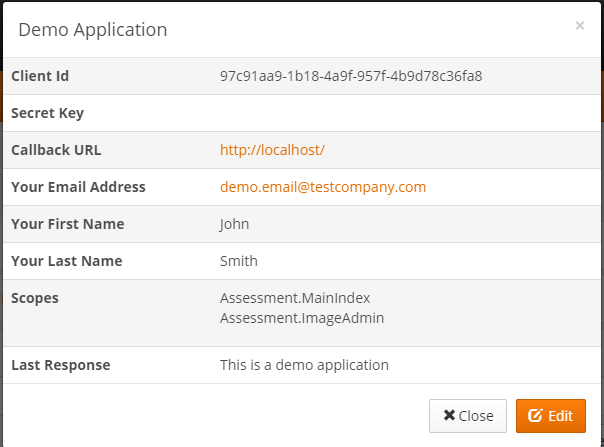
In order to review details provided by an application click on the View button. This will bring up a new form which will display information about the application
Application name is provided at the top of the form
Client Id – this is a unique number to identify the application
Secret key – This is the secret key that is provided once the application has been approved, if this is blank the application has not been approved or has been rejected.
Callback URL – URL which will be used to redirect the browser with the authorisation code
Your Email Address
Your First Name
Your Last Name
Scopes – The current scopes that have been requested for use by the application
Last Response – This field will contain the last item of feedback provided during the approval process, if it is empty no feedback has been given.
Clicking on “Close” will exit the form and clicking on Edit will open the edit form.
Once an application has been created you are able to update any of the fields beside the comments. The edit form can either be accessed by the “Edit” button on the Applications form or the “Edit” button when viewing an application.
You can use this form to update any of the fields. Please refer to the Create an application section for more details on each field. Once you are happy with the changes click on the save button.
If this application has yet to go through approval the edited version will replace the previous version of the application. If the app is live the edit button will be removed from the live application and the edited copy will appear in the Pending Updates for Existing Live application.
The approved version of the application will still remain live. You can make any further edits using this copy which will then replace the previous version. If the application was in the Rejected application it will now be moved to the pending new applications section where it can now go through the approval process again.
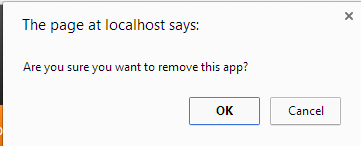
Clicking on the Remove button will show a prompt form which will ask you to confirm if you wish to remove the application, if you are happy to remove the application click ok.
Removing a rejected, live or new application will remove that application and any copies that have been created when the application was edited. Removing from pending updates will just remove the edited version and will open up the live application to once again be edited.
Important note that any removed applications cannot be recovered.